
15 Ways To Speed Up Your SketchUp Workflow
Make SketchUp Even Faster Using These Ideas
SketchUp is one of the world’s leading digital design software. Architects of all levels use it to create 3D models. Those just starting out can use SketchUp to get to grips with 3D modelling. With the right plug-ins, professionals can use SketchUp to create quality models for clients.
Efficiency is key in SketchUp. The software offers a simple, user-friendly way to create an array of objects. This simplicity makes SketchUp one of the quickest digital design software around. You can have basic objects on your screen in a matter of minutes.
Even so, there is still plenty you can do to make SketchUp more efficient. That’s where these 15 tips come in. Each will help you improve your workflow and create models quickly.
Tip #1 – Use Groups and Components
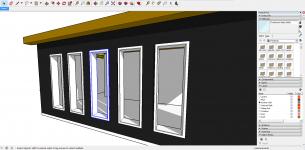
Every model and object you create in SketchUp takes space. Saving each as an individual file will quickly eat into the available space on your hard drive. Beyond that, you will waste time opening each one as an individual object.
That’s where groups and components come in. You can pull together individual objects into a group so that you can access them together. This is crucial when working on complex models that use a lot of objects. Components work slightly differently. They are ideal for use with objects that you will use a lot across several models. Turning an object into a component allows you to make changes to that object that reflect across all instances of the component.
Tip #2 – Use the Help Tools

SketchUp may be simple to use. However, that doesn’t mean that you won’t need some help to get the most out of it. Newbies will find that they spend a lot of time getting to grips with the software. With so many tools at your disposal, it can be difficult to figure out what each one does on your own.
That’s where the Instructor panel can help. Look to the side of your screen and you will see the panel. It offers information about whatever tool you have selected and some tips on how to use that tool effectively. The animation that accompanies this information shows the tool in action. You’ll even find links to more in-depth explanations. This is unique in digital design software and is the perfect way to learn as you go.
Tip #3 – Change Your Display Style
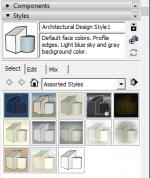
The default SketchUp view has several options turned on by default that can slow your progress down. Key among these are the Face Style and Shadow settings. You can access both using the View option in the menu. For maximum efficiency, uncheck the Shadows setting and set your Face Style to the Shaded option.
Granted, this will make your models look more simplistic. However, that’s not a big problem when you’re working on them. You can create a working scene with the settings above to speed things up while activating the options again in a display scene. It just comes down to speed. Having those options turned on means you have to wait for SketchUp to apply shadows and different face styles when you’re working.
Tip #4 – Use the Shortcuts
SketchUp comes with a variety of shortcuts, which it assigns to different hotkeys. You can use these to access the digital design software’s many tools quickly. Learning what they are is key to speeding up your workflow. You may only save a few seconds each time you access a tool. However, those seconds will add up to a lot of minutes saved when working on complex models.
You can also edit your toolbars and menu items. Again, this provides fast access to the tools that you need for the model you’re working on. It is good practice to edit your toolbars and assign your favourite hotkeys at the beginning of any project. That way, you have them available to you whenever you need them.
Tip #5 – Purging Files

SketchUp does a lot of things automatically whenever you save a file. It will actually save any object you make as a separate file as soon as you create the object. This file gets saved to your library. Even if you delete it, you can access the file from the library at any time.
This is really useful if you accidentally delete an object or need to use one you created a long time ago. However, it also makes your typical file space very big. The larger the file, the more time it takes to load. Happily, you can get rid of anything you no longer use. Head to the Window option and click Model. Go to Info and click on Statistics. You should see the Purge Unused option here. Click it to tell SketchUp to get rid of any files you don’t use. You should notice the software runs more smoothly when the purge ends.
Tip #6 – Use Your Guidelines
Working on 3D models using a 2D monitor presents a lot of difficulties. Without any guidance, you will need to rely on your ability to mentally visualize the model you’re working on. SketchUp provides guidance and you should use it.
This guidance comes in the form of guidelines. Also referred to as rulers, guidelines create a grid on which you can build your models. They are flexible and you can point them in any direction. A pair of parallel guidelines will help you keep the space between two objects uniform. They can also help you snap objects together, create straight lines and keep track of your measurements. Take some time to set them up and you will avoid common 3D modelling mistakes later on.
Tip #7 – Using Layers
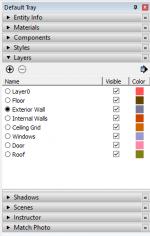
Layers help you work on more complex models. You can create the broad model on a base layer and dedicate a layer each to your mode detailed objects. Doing this allows you to toggle the objects on and off as needed. You can work on the detailed objects in their own layer and turn them off again when you need to work on the base model.
Layers come with some issues so you need to use them properly. A good tip is to build your base model and the basic outlines of your detailed objects on Layer0. From there, group all of the objects you want to keep on the Layer0 page. After that, select each remaining object individually and assign it to a new layer using the Entity Info toolbar.
Tip #8 – Rely on the Inference Engine

SketchUp offers a way to keep track of the alignment of your objects. Known as the “Inference Engine”, this feature is unique among digital design software. The engine keeps a constant eye on your models. In particular, it examines how every object you create relates to the 3D space and the other objects in your model. Whenever it spots an issue, it automatically creates a colour-coded visual that draws you eye to the problem.
The Inference Engine creates cues in a lot of scenarios. It will tell you when an object is parallel to another object’s edge and let you know if it’s on the axis. It gets more detailed from there. The engine can be intimidating at first. However, you’ll soon get used to it. In time, you will find it is one of SketchUp’s most valuable features.
Tip #9 – Finding Hidden Geometry

As you create your model, SketchUp may create hidden geometry. There are various reasons why this geometry may form. Perhaps you have deleted an object and its residual geometry stays behind. Whatever the case may be, it slows your software down. The worst of it is that you can’t even see it happening.
Actually, that isn’t the case. You can access any hidden geometry if you head to the View menu and click the Hidden Geometry setting. This will show any hidden geometry as a sort of mesh pattern. Delete all of them and you will find your SketchUp digital design software works more efficiently.
Tip #10 – Spotting Flipped Faces
A flipped face spotted too late will cause a lot more work for you. SketchUp has a nasty habit of creating flipped faces in some circumstances. For example, the digital design software tends to create them whenever you use the FollowMe command. Sometimes it does it with the PushPull command. Flipped faces lead to incorrect or unapplied textures, which will mess up how your model looks.
You can get around this problem using a different face style setting. The Monochrome Face Style is ideal for pointing out flipped faces, especially after you’ve applied a texture. The default side gets marked out as grey, with the opposite side being blue. A bit of blue in a sea of grey tells you that you have a flipped face on your hands.
Tip #11 – Saving and Opening Files
You may not put a lot of thought into how saving and opening files affects your workflow in SketchUp. After all, it’s a simple process. Click save or open a file. It takes seconds, right?
Not necessarily. The action may take no time at all but you may find you spend a lot of time waiting for the process to complete. You can save this time by changing a few settings before saving a file. Turn all of the shadows off and do the same for any extra layers that you don’t need open when you come back to the file. This will speed up the save. Better yet, it will also mean that the file opens quicker. That is all time saved that you can put towards working on the model itself.
Tip #12 – Using Photo Matching

SketchUp offers one of the best photo matching features of any digital design software. Even so, you need to know what you’re doing to get the most out of it. Success with photo matching relies on two things. The first is the use of a photo that has not undergone editing of any kind. The second is ensuring your model matches the scale of the subjects in the photo.
Get that right and you’re off to a good start. You should also adjust the SketchUp camera’s focal length so you can match it to the photo you import. Place your origin mark at the spot on the photo where you will place your model. From there, align the green and red axes to the features of the subjects in the photo to make sure everything goes in the right direction.
Tip #13 – Create Some Templates
You may have a set of default settings you like to use when creating your models. You may also find that you have a few settings you use for different types of models. Creating templates will ensure you don’t have to create these settings whenever you open SketchUp.
It’s easy to do. Just open SketchUp and make any adjustments you want to the workspace. When you finish, save the workspace as a new file. Give it a name that tells you what sort of template it is. You can now open that template whenever you want it. Just remember to save the file with a different name upon opening so you can add objects to it without ruining the template.
Tip #14 – Pick Components Wisely
We mentioned components earlier in the article. A component allows you to save an object you use all of the time so you can pop it into any models where you need it. Any changes made to the component get saved and applied to any models using the component.
This is great, but anybody who has used digital design software before will tell you that it can create problems. Changing a complex component could cause issues in one of the models that uses it if the change doesn’t mesh with the rest of the model. To avoid this, only select simple, base objects as components. You can then add complex elements to that component within the model itself, rather than altering the component.
Tip #15 – Group Then Layer
Let’s conclude by coming back to the issues of groups and layers. We’ve already established how each can speed up your workflow in SketchUp. However, you can run into problems if you use them incorrectly.
A good rule of thumb is that grouping always comes before creating a layer. This means you can separate your geometry while ensuring the base geometry of the grouped objects stays on Layer0.
The Final Word
We hope that you find these 15 tips useful. Those starting out with SketchUp should start applying these tips to their work right away. We also hope that those with more experience have found something new here.
ArchiStar Academy courses can help if you want to learn more about SketchUp. Contact us today to find out about the courses we offer.
If you would like to share your thoughts on our blog, we’d love to hear from you!
Get in touch with the ArchiStar Academy community via Facebook.
Posted on 20 Jan 2020